
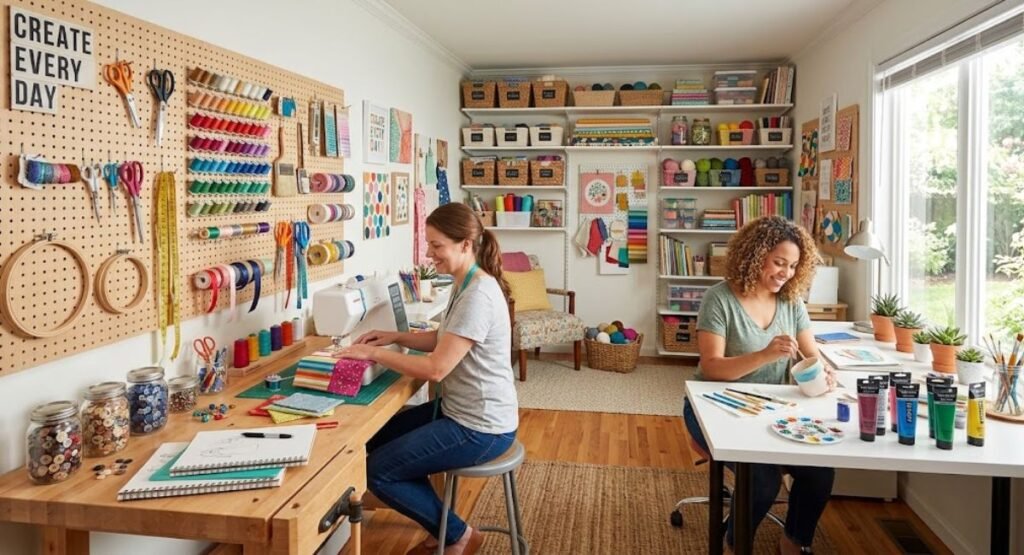
introduction
A well-designed craft room can make creative projects more enjoyable, organized, and inspiring. Whether you love sewing, painting, scrapbooking, DIY projects, jewelry making, or other creative hobbies, having a dedicated space can help you keep your supplies organized while giving you a comfortable place to work.
A craft room does not need to be large or expensive. Even a small corner can become a functional creative workspace with the right storage, furniture, lighting, and decorating ideas. From open shelving to clever drawer organizers, there are plenty of ways to create a room that looks beautiful while keeping everything within easy reach.
Choose a Dedicated Crafting Area
The first step is deciding how much space you can dedicate to crafting. A spare bedroom, basement, home office, or unused corner can become a creative workspace.
If you have a large room, divide it into different zones for crafting, storage, cutting, sewing, and displaying finished projects. For smaller spaces, focus on multifunctional furniture that gives you plenty of workspace without taking up too much floor area.
Select a Functional Craft Table
A sturdy craft table is one of the most important pieces of furniture in the room. Choose a table that provides enough surface area for your projects and supplies.
A large rectangular table works well for sewing, painting, paper crafts, and DIY projects. If space is limited, consider a folding table or a desk with built-in drawers.
Choose a comfortable working height and make sure there is enough room underneath for your legs and storage containers.
Add Plenty of Storage
Good storage can completely transform a craft room. Instead of allowing supplies to pile up on the table, give every category its own storage area.
Use cabinets, shelves, drawers, baskets, bins, and containers to organize materials. Keep frequently used supplies within easy reach and store seasonal or rarely used items in less accessible areas.
Install Open Shelving
Open shelves are an excellent choice for craft rooms because they make supplies easy to see and access. They can also add personality to the room.
Arrange colorful paper, fabric, yarn, paint bottles, books, and decorative containers on the shelves. Use matching storage boxes to maintain a clean appearance.
Open shelving is especially useful when you need to quickly find materials while working on a project.
Create a Pegboard Wall
A pegboard can turn an empty wall into useful storage. Hang scissors, rulers, brushes, ribbons, tools, and other frequently used supplies where they are easy to reach.
The arrangement can also be changed whenever your crafting needs change. This makes pegboards a flexible storage solution for both small and large craft rooms.
Use Clear Containers
Clear containers make it easier to find supplies without opening multiple boxes. They are especially useful for buttons, beads, ribbons, stickers, threads, small tools, and craft embellishments.
Group similar items together and label each container. This simple system can save time and prevent the workspace from becoming cluttered.
Add a Comfortable Craft Chair
A comfortable chair is essential if you spend long periods working on creative projects. Choose a chair that provides good support and allows you to sit comfortably at your craft table.
An adjustable chair can be particularly useful because you can customize its height according to the table. If the room has a colorful design, choose a chair that complements the overall decor.
Improve the Lighting
Good lighting is essential for detailed craft projects. Natural light is ideal, so place your main workspace near a window whenever possible.
Add a desk lamp or adjustable task light for evenings and cloudy days. Layering overhead lighting with focused task lighting helps reduce shadows and makes small details easier to see.
Create a Sewing Station
If sewing is one of your favorite hobbies, dedicate a specific area to your sewing machine and supplies.
Install drawers or shelves nearby for thread, needles, scissors, fabric, patterns, and other sewing essentials. A cutting table with storage underneath can also make sewing projects much easier.
Keeping everything close to the sewing machine allows you to work more efficiently.
Organize Your Fabric Collection
Fabric can quickly become difficult to manage without proper storage. Fold fabric pieces neatly and organize them by color, pattern, or material.
Open cubbies are useful for displaying folded fabric, while drawers can hide larger collections. You can also use labeled baskets to separate fabrics according to project type.
Keeping fabrics organized makes it easier to find exactly what you need.
Add a Paper Station
Paper crafts require plenty of small supplies, so a dedicated station can be very useful. Store cardstock, scrapbook paper, stickers, stamps, cutting tools, and adhesives together.
Use vertical organizers for paper and small drawer units for embellishments. Keep scissors and cutting tools in a designated container so they are always easy to locate.
Create a Painting Corner
Artists can create a dedicated painting corner with an easel, table, storage cart, and cleaning supplies.
Use wall-mounted shelves to store paint bottles and brushes. A washable surface can make cleanup easier, especially if you frequently work with paints or other messy materials.
Natural light can also be helpful when working with colors.
Use a Rolling Storage Cart
A rolling cart provides flexible storage that can move wherever you are working. It is ideal for frequently used supplies such as paints, brushes, yarn, tools, or sewing materials.
Choose a cart with several levels so different categories can be separated. When your project is finished, simply roll the cart back into its storage area.
Add Drawer Organizers
Small craft supplies can quickly become mixed together. Drawer organizers help separate everything into neat categories.
Use small compartments for buttons, beads, clips, threads, ribbons, stickers, and other tiny items. Labeling the drawers makes the organization system even easier to maintain.
Make Use of Vertical Space
When floor space is limited, look upward. Walls can provide valuable storage without reducing the available workspace.
Install shelves, pegboards, wall rails, hooks, or hanging baskets. Vertical storage is especially useful in small craft rooms because it keeps supplies off the table and floor.
Add a Color-Coded Organization System
A color-coded system can make a craft room both functional and attractive. Organize supplies according to color when it makes sense for your hobby.
For example, fabrics, yarn, paper, or ribbons can be arranged from light to dark shades. This creates a visually pleasing display while making supplies easier to find.
Create a Small Display Area
Your craft room should not only store supplies; it can also celebrate your creativity. Create a small display area for finished projects.
Use floating shelves, framed artwork, pegboards, or a gallery wall to showcase handmade pieces. Seeing completed projects can provide inspiration for your next creative idea.
Add a Mood Board
A mood board can help you collect ideas, colors, patterns, and inspiration in one place. Use a corkboard, magnetic board, or framed grid to display photographs, fabric samples, sketches, and inspirational quotes.
Change the board whenever your interests or projects change.
Choose a Calm Color Scheme
The right colors can influence how the room feels. Soft white, beige, sage green, dusty blue, and warm gray can create a calm and sophisticated workspace.
If you prefer a more energetic environment, introduce brighter colors through accessories, storage boxes, artwork, and textiles.
A neutral foundation also makes colorful craft supplies stand out beautifully.
Add a Cozy Rug
A soft rug can make a craft room feel warmer and more comfortable. Choose a rug that is easy to clean, especially if you work with paint, glue, or other messy materials.
A small rug underneath the main workstation can visually define the crafting area without overwhelming the room.
Use a Craft Room Island
If you have enough space, consider adding a central work island. It provides additional workspace and can include drawers or cabinets for storage.
A craft island is particularly useful for cutting fabric, assembling projects, wrapping gifts, or spreading out larger materials.
Make sure there is enough walking space around the island so the room remains comfortable and functional.
Create a Small Gift-Wrapping Station
A craft room can double as a gift-wrapping station. Store wrapping paper, ribbons, gift bags, tags, tape, and scissors in one dedicated area.
A wall-mounted organizer can hold rolls of wrapping paper, while drawers can store smaller accessories. This keeps everything together and makes gift wrapping much easier.
Add Labels Everywhere
Labels are one of the simplest ways to maintain an organized craft room. Label baskets, drawers, bins, and shelves according to their contents.
Use simple printed labels for a clean look or decorative labels for a more creative appearance. Clear labeling also makes it easier for everyone in the household to return supplies to the correct location.
Make the Room Multifunctional
If you do not have an entire room available for crafting, create a multifunctional space. A home office, guest room, or closet can include a compact crafting station.
Use a fold-down desk, rolling cart, or storage cabinet to create a workspace that can be packed away when needed.
This approach allows you to enjoy crafting without requiring a large dedicated room.
Keep the Workspace Clutter-Free
An organized craft room needs regular maintenance. At the end of each project, return supplies to their designated locations.
Keep a small wastebasket near the craft table and regularly remove scraps, empty containers, and materials you no longer need.
A clean workspace makes it easier to start your next project and keeps the room visually appealing.
Craft Room Ideas at a Glance
| Craft Room Feature | Best Use | Main Benefit |
|---|---|---|
| Craft Table | General projects | Large working surface |
| Open Shelves | Supplies and decor | Easy access |
| Pegboard | Tools and small items | Saves wall space |
| Clear Bins | Small supplies | Easy visibility |
| Rolling Cart | Frequently used items | Flexible storage |
| Drawer Organizers | Tiny materials | Keeps items separated |
| Craft Island | Large projects | Extra workspace |
| Task Lighting | Detailed work | Better visibility |
Final Thoughts
A beautiful craft room should inspire creativity while making your hobbies easier and more enjoyable. You do not need a huge budget or a large room to create an effective workspace.
Start with a comfortable craft table, reliable lighting, practical storage, and a simple organization system. Then personalize the room with colors, artwork, displays, and decorative details that reflect your creative style.
Whether you enjoy sewing, painting, scrapbooking, knitting, jewelry making, or DIY projects, a thoughtfully designed craft room can become one of the most enjoyable spaces in your home.
FAQs
Q: How do I organize a small craft room?
A: Use vertical shelves, pegboards, wall-mounted organizers, clear containers, and rolling carts to maximize storage without taking up too much floor space.
Q: What furniture is essential for a craft room?
A: A sturdy craft table, comfortable chair, storage cabinets, shelves, and good lighting are the most useful basics.
Q: How can I make my craft room look stylish?
A: Choose a coordinated color palette, matching storage containers, attractive lighting, a comfortable rug, and a small display area for finished projects.
Q: What is the best storage for small craft supplies?
A: Clear containers, divided drawers, labeled bins, and small organizer boxes work well for buttons, beads, threads, ribbons, and other tiny materials.
Q: Can I create a craft room in a small space?
A: Yes. A compact desk, fold-down table, wall storage, and rolling cart can turn even a small corner into a practical crafting station.