
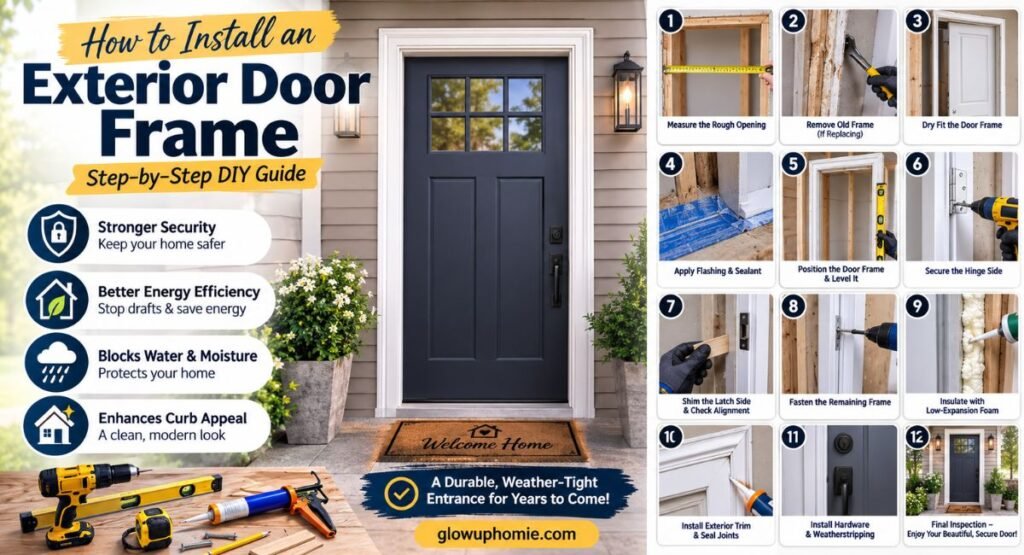
Installing an exterior door frame is one of the most important steps in creating a secure, weather-resistant, and energy-efficient entrance. Whether you’re replacing an old frame or installing one in a new construction project, proper installation ensures your exterior door opens smoothly, seals tightly, and lasts for years.
This guide walks you through the complete process, from gathering tools to making the final adjustments.
Why Proper Door Frame Installation Matters
An exterior door frame does much more than hold the door in place. A correctly installed frame:
| Benefit | Why It Matters |
|---|---|
| Improves security | Prevents forced entry and strengthens the doorway. |
| Increases energy efficiency | Reduces drafts and heat loss. |
| Prevents water damage | Keeps rain and moisture outside. |
| Extends door lifespan | Reduces stress on hinges and hardware. |
| Enhances appearance | Creates a clean, professional finish. |
Tools and Materials You’ll Need
Before starting, gather the following:
- Exterior door frame
- Prehung exterior door (optional)
- Tape measure
- Level (4-foot recommended)
- Framing square
- Hammer
- Drill/driver
- Wood shims
- Galvanized screws
- Exterior-grade nails
- Utility knife
- Pry bar
- Caulk gun
- Exterior sealant
- Expanding foam insulation (door/window type)
- Safety glasses
- Work gloves
Step 1: Measure the Rough Opening
Measure:
- Width
- Height
- Diagonal corners
The rough opening should generally be about 2 inches wider and taller than the finished door size to allow room for shimming and adjustments.
Also check that:
- Floor is level
- Walls are plumb
- Corners are square
Correcting framing issues now saves time later.
Step 2: Remove the Existing Door Frame (If Replacing)
If replacing an old frame:
- Remove the door.
- Take off interior trim.
- Cut through old caulk.
- Remove screws and nails.
- Carefully pry out the frame.
- Clean the rough opening.
Inspect the framing for:
- Rot
- Mold
- Water damage
- Insect damage
Repair any issues before installing the new frame.
Step 3: Dry-fit the door frame.
Place the new frame into the opening without fastening it.
Check that:
- It fits comfortably.
- There is even spacing.
- The threshold sits flat.
- The frame isn’t twisted.
Remove it again after checking.
Step 4: Apply Flashing and Sealant
To prevent leaks:
- Install flashing tape around the sill.
- Add flashing to side jambs if needed.
- Apply exterior-grade caulk under the threshold.
This creates a waterproof barrier before installation.
Step 5: Position the Door Frame
Place the frame back into the opening.
Center it carefully.
Insert temporary shims behind:
- Top hinge
- Middle hinge
- Bottom hinge
Use a level to ensure:
- Hinge side is perfectly plumb.
- Header is level.
- The latch side is straight.
Take your time with this step because the entire installation depends on proper alignment.
Step 6: Secure the Hinge Side
Drive long exterior screws through the hinge locations and into the framing.
Do not overtighten.
Check the level after each screw.
If needed, adjust the shims until the frame remains perfectly vertical.
Step 7: Shim the Latch Side
Insert shims behind the strike plate and at several points along the latch side.
Close the door to verify:
- Even reveal around all sides
- Smooth operation
- No rubbing
Adjust shims until the gap is consistent.
Step 8: Fasten the Remaining Frame
Once everything is aligned:
- Install screws through the latch side.
- Secure the top jamb.
- Recheck operation after every few screws.
The door should open and close effortlessly.
Step 9: Insulate Around the Frame
Fill the gap between the frame and rough opening with low-expansion foam made specifically for doors and windows.
Avoid overfilling.
Too much foam can bow the frame and cause the door to stick.
Allow the foam to cure before trimming the excess.
Step 10: Install Exterior Trim
Attach exterior casing or brick molding.
Seal all joints using exterior caulk.
Pay special attention to:
- Top corners
- Side joints
- Bottom threshold
Proper sealing prevents future water intrusion.
Step 11: Install Hardware
Install:
- Hinges (if not prehung)
- Lockset
- Deadbolt
- Strike plate
- Door sweep
- Weatherstripping
Test the lock several times.
Everything should align without forcing the latch.
Step 12: Final Inspection
Before calling the job complete, verify that:
- Door opens freely.
- Door closes securely.
- Weatherstripping seals evenly.
- Locks operate smoothly.
- Frame is square.
- Threshold is level.
- Exterior caulking is complete.
Common Mistakes to Avoid
- Skipping flashing tape
- Not checking for level
- Using too much spray foam
- Overtightening screws
- Forgetting to shim behind hinges
- Leaving gaps unsealed
- Installing hardware before alignment
Avoiding these mistakes helps ensure a durable, weather-tight installation.
Maintenance Tips
After installation:
- Inspect caulking once a year.
- Tighten loose screws as needed.
- Replace worn weatherstripping.
- Keep the threshold clean.
- Lubricate hinges and locks annually.
- Repaint or reseal wood frames when necessary.
Regular maintenance can significantly extend the life of your exterior door.
Frequently Asked Questions
Q: Can I install an exterior door frame by myself?
A: Yes. An experienced DIYer can install one successfully, although having a second person makes lifting and positioning much easier.
Q: Should I use nails or screws?
A: Exterior-grade screws are generally preferred because they provide stronger, more secure fastening and allow for easier adjustments.
Q: How much gap should be around the frame?
A: Leave approximately 1/4 to 1/2 inch between the frame and the rough opening to allow for shims and insulation.
Q: What type of foam should I use?
A: Use low-expansion foam specifically designed for windows and doors. Standard expanding foam can distort the frame.
Q: How long does installation take?
A: Most DIY installations take 3–6 hours, while experienced professionals often complete the job in 2–4 hours.
Final Thoughts
Installing an exterior door frame requires careful measuring, precise leveling, and proper sealing to achieve a secure, weather-resistant fit. By taking your time with shimming, fastening, and insulation, you can create a durable installation that improves your home’s security, energy efficiency, and curb appeal for years to come.